Scheduling Cron Jobs on Heroku with Ruby on Rails
A common practice is to create a cron job whenever you have a task you need done periodically.
The software utility Cron is a time-based job scheduler in Unix-like computer operating systems. People who set up and maintain software environments use cron to schedule jobs (commands or shell scripts) to run periodically at fixed times, dates, or intervals. [^1]
On something like AWS, you would have the ability to create normal cron jobs and, when dealing with a Ruby on Rails application, you could use the Whenever gem to interface between Cron and your application code.
On Heroku, this isn't possible
This is due to Heroku's Dyno infrastructure, which is composed of virtualized Linux containers that are restarted daily, which resets it's file system. Heroku also states that Cron does not perform well on horizontally scaling platforms.
Luckily, Heroku has an add-on that just came out of beta which makes for a pretty easy solution. The Scheduler add-on is free, utilizes one-off dynos (whose uptime will count towards your monthly usage), and will make use of Rake tasks (for non-rails applications, scripts can be add to the bin/ directory).
Let's install the add-on. This can be done via the CLI or the web UI, but I'll show you the CLI method. This assumes you already have the Heroku CLI installed and logged in.
$ heroku addons:create scheduler:standard
Now let's define a task. Let's say you're app needs to send a reminder for customers with appointments that day.
desc "Send appointment reminders"
task :send_reminders => :environment do # :environment will load our Rails app, so we can query the database with ActiveRecord
  appts = Appointments.where(appointment_date: Date.today)

  appts.each do |appt|
    AppointmentMailer.reminder(appt)
  end
end
Now it's time to deploy this code.
Great, now how do we schedule this task to run? Let's hop over to Heroku's web UI. You can find this in the list of installed add-ons on the dashboard for your app, or you can run the following command in your terminal. (If you have more than one app, append --app <your app's name> to the command.)
$ heroku addons:open scheduler
You should now see a screen similar to this.
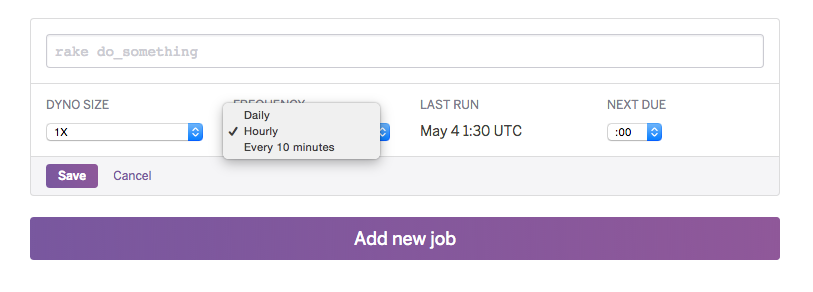
Since we want to remind customers of their appointments for the day, we'll set the Frequency to Daily and the Next Due to 10:00. Note that the Next Due time is in UTC, so 10:00 is 6:00AM where I live. After clicking Save, your scheduled job should be live.
And there we have it! This solution is ideal for basic tasks like sending emails, but for heavier, longer running jobs, you should look into configuring a Custom Clock process.